Learn everything you need to know about Gravity Forms shortcodes: what they are, the most important kinds, and how to get started using each.
You can use Gravity Forms shortcodes to extend Gravity Forms functionality in WordPress and take full advantage of the abundance of Gravity Forms features anywhere you’d like — without knowing how to code.
And this is just a taste. This article will explore what Gravity Forms shortcodes are, the countless applications of shortcodes available (all of the above and more), and how you can implement them on your WordPress site in just a few minutes.
But let’s not get ahead of ourselves!
Shortcodes allow you to extend built-in functionality on your WordPress site without needing code.
Non-developers use these simple lines of code to achieve extraordinary functionality otherwise required through coding experience. For example, you can display interactive forms, manage dynamic content, and display any form of media. Take it further and add checkouts, register your users, gate your content, run split tests, or bring other applications directly into your website pages.
In short, shortcodes provide near endless possibilities with no need for frontend experience. There are thousands of shortcodes in the WordPress world, and you can also write them yourself.
This emphasized pop-out block is made with a custom shortcode we built. Hello, world!
Shortcodes come in the form of small one-liners of code that perform dedicated functions. They are an excellent approach to keeping content tidy and semantic while giving users the flexibility to programmatically change the appearance and layout of their website and its content.
Shortcodes are indicated using brackets like [example shortcode] and add specific features to a post or page. You can add a glitter trail of shortcodes to your website, including the WordPress form shortcode, video shortcodes, gallery shortcodes, and audio shortcodes. Through each option, shortcodes enable you to add dynamic and specialized content easily.
This isn’t an article about WordPress shortcodes, however. Let’s talk about Gravity Forms shortcodes.
As one of the most widely used form-building plugins in the WordPress world, Gravity Forms can be used to power any form configuration you can muster. Popular applications of Gravity Forms include creating web forms to capture leads, collect payments, automate workflows, and build no-code apps. But this flexible form-building machine also does a heck of a lot more.
Through shortcodes, you can take advantage of the numerous Gravity Forms applications and slap them directly to any WordPress site page without needing coding experience. Let’s jump to a quick example.
Below, you’ll find a shortcode for a form that lets you sign up for our newsletter.
The original Gravity Forms shortcode looks like this:
[gravityform id pl-c1">13" title pl-c1">true" description pl-c1">true" ajax pl-c1">true"]
And here’s the output (yes, it works!).
Don't miss a thing. Get our weekly updates by owl or email. Ok, we're still working on the owl service, so just email for now.
Applications go far beyond just embedding Gravity Forms. You can display forms in combination with conditional logic, run split tests, create dynamic, personalized form content based on who’s viewing it, indicate progress towards submission goals, and more that we will explore below. We’ll start, however, with the basics.
Looking for a specific type of Gravity Forms shortcode? Jump to the table of contents.
Before diving deeper into the magical capabilities of Gravity Forms shortcodes, it’s important to note that there’s a way to add Gravity Forms to your WordPress website without using a shortcode.
Because it integrates with the Block Editor (Gutenberg), you can add any forms you need with a few clicks. Let’s look at two ways to add Gravity Forms without using shortcodes.
The Gravity Forms block is the easiest way to add a form to your post or page. Simply search for “Gravity Forms” in the Block Inserter and click on it. The Gravity Forms block will be added to your content.
You can then call forth the form you wish to add by scrolling the Gravity Forms drop-down menu. Note — you will need to have Gravity Forms installed on your site first.
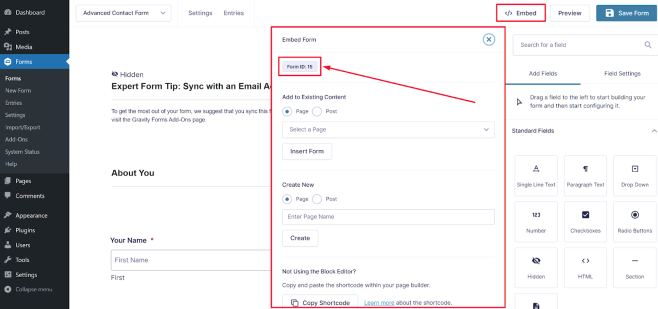
The Embed Menu provides a simple method for embedding your form on a page or post from the Form Editor. It allows you to add your form to a new or existing page or post using the WordPress Block Editor. You may also use this interface to extract the shortcode and then paste it into your form using standard shortcode techniques.
The Form Editor’s top bar has an embed button. Click to load the Embed Menu.
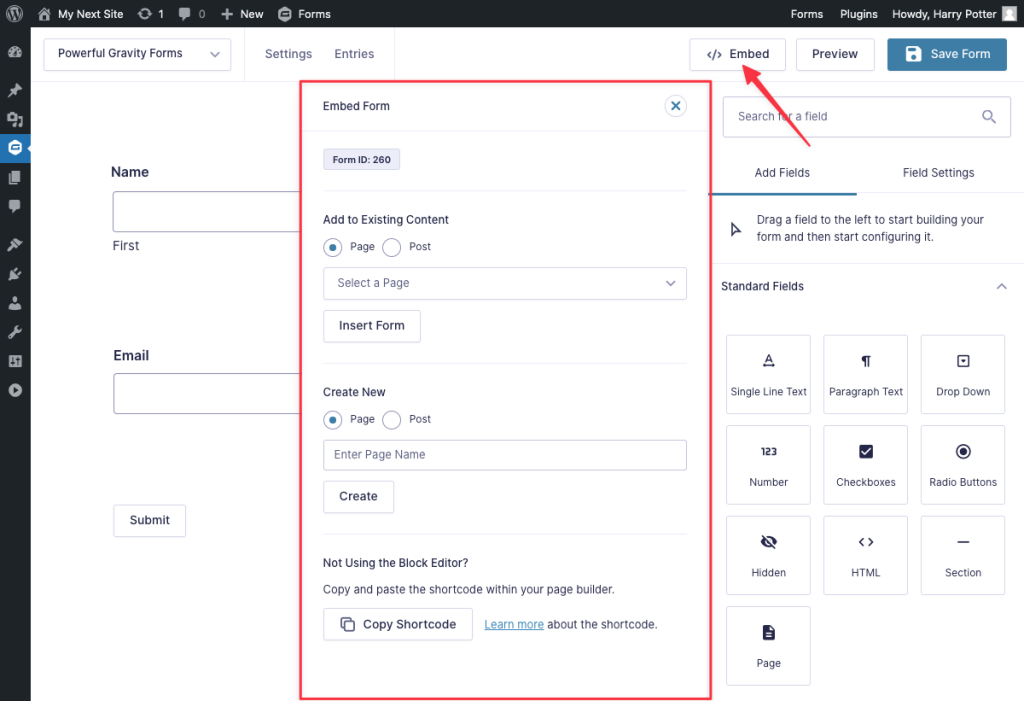
You can do a lot with the Embed Menu:
Users still using the Classic Editor can copy the form shortcode from within the Embed Menu and paste it. More about the Classic Editor below.
Now that we know how to add Gravity Forms to a page without using a shortcode, let’s look at how to add them with one. We’ll start with the Gravity Forms embed shortcode.
There are two easy ways to generate the default Gravity Forms shortcode. Let’s explore both.
If you’re using the Classic Editor, the “Add Form” button that appears above the post content section will make it a cinch to generate a shortcode to embed your form.
Click this button to launch the Insert Form modal.
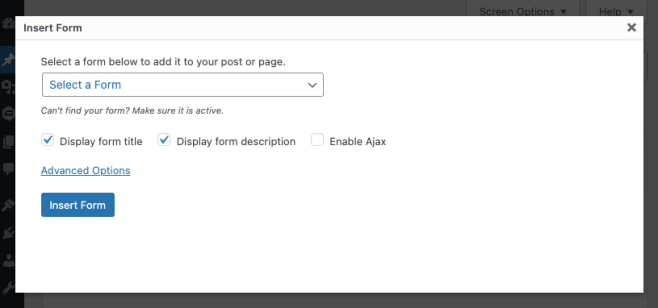
Then, select the form you want to display from the drop down menu. If your form does not appear on the drop-down menu, it probably means it is disabled. You’ll need to enable it before you can proceed.
Other settings include:
You can also render the form with AJAX to bypass caching issues with our free Gravity Forms Cache Buster plugin.
The Embed Menu provides an easy way to automatically insert a Gravity Forms block on any post or page but it also provides a quick way to grab the Gravity Forms shortcode for a given form. Just click the “Copy Shortcode” button at the bottom of the menu and you’re ready to paste it wherever shortcodes are supported.
Before the Block/Gutenberg editor, WordPress site owners were using the classic editor where they would paste a shortcode in its own line in a page/post. This was a confusing method to some, but it worked, and it’s what we had. However, since WordPress 5 was released, the Gutenberg editor changed the approach because it comes with dedicated shortcode blocks.
You can easily add a Gravity Form to a page with a shortcode in both the Classic Editor and the Gutenberg editor. Just copy and paste the shortcode to its own line on a post or page as shown below:
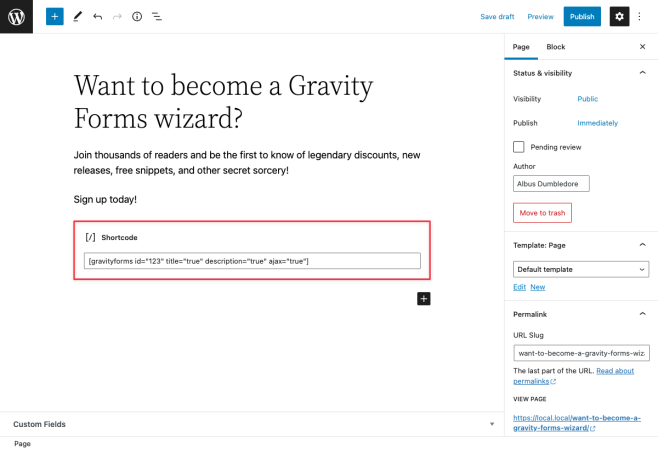
This is the same page when using the Classic Editor:
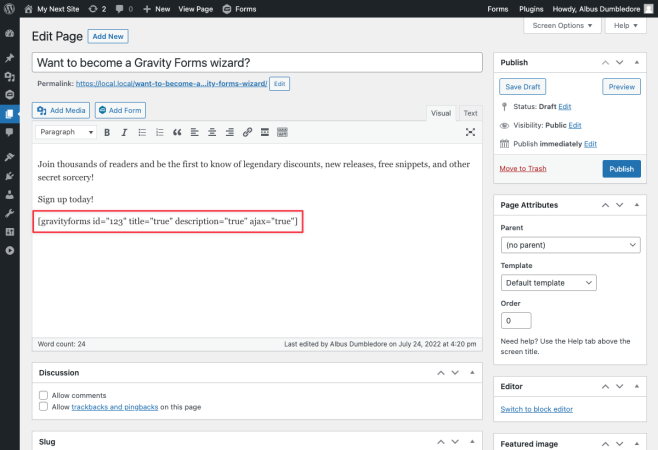
If you’re manually adding a [gravityform] shortcode, the first thing you’ll need is the form ID. Here’s how to find it:
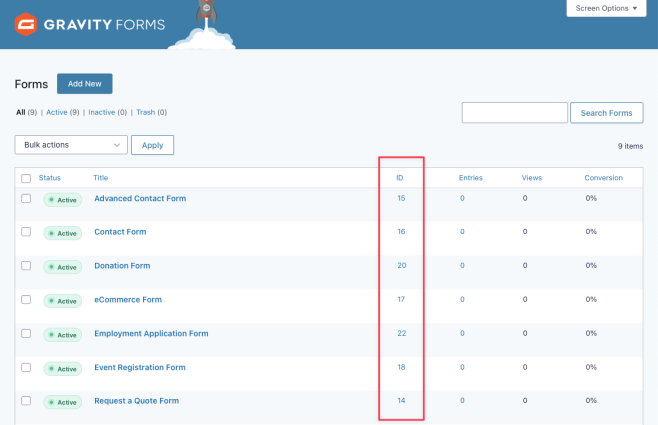
Bonus: You can also find the form ID in the Embed UI.
Now that you’ve got your embed shortcode embedded 😉 let’s explore all that it can do!
We’ve mentioned the “default” Gravity Forms shortcode, which will embed a Gravity Form anywhere shortcodes are supported – think posts, pages, custom post types, and page builders! This shortcode is also referred to as the Embed Shortcode.
A typical embed shortcode should look like this:
[gravityform id pl-c1">7" title pl-c1">false" description pl-c1">false" ajax pl-c1">true"]
Here’s a simple example of a form being outputted:
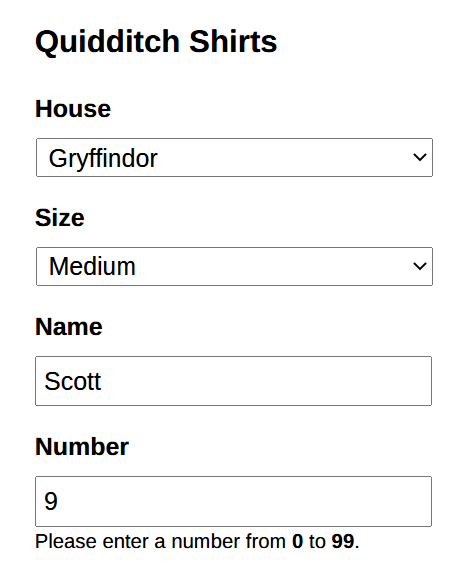
The Embed Shortcode provides options for hiding descriptions or titles and disabling Ajax requests, so your website doesn’t suffer slow load times. You can also dynamically pre-populate field values, meaning less time spent on the user’s end and more conversions for you.
Gravity Forms has many parameters that let you customize how a form appears and behaves. Before we tackle the complete list of different shortcodes, let’s discuss each.
Shortcode parameters are attributes of a shortcode that define its function. Every shortcode has some default parameters and additional parameters that add functionality to the shortcode. Let’s start with common Gravity Forms shortcode parameters.
The four parameters above are the most widely used. Other parameters that can be included:
Take this a step further with Populate Anything, which allows you to dynamically populate form fields form any source in real time — including Google Sheets! you can combine this with Read Only to prevent users from changing default values on your fields.
Imagine using the same form on different pages. The first page of your form collects the user’s primary information. You then use the same form on specific interest landing pages. Given that the user’s primary interest is already established, you don’t need the form’s first page anymore.
You can use parameters that set a different page other than the first page (e.g., page 2) as the starting page. Fewer pages lead to better conversions as well as a better user experience.
Here’s an example of such a shortcode:
[gravityform id pl-c1">123" page pl-c1">2"]
In this instance:
Caching reduces the bandwidth needed to load files and pages. It also improves WordPress site performance. That said, aggressive caching can sometimes cause unexpected issues, especially when dealing with dynamically populated content. For instance, values specific to one user can be cached and displayed to all users. The Cache Buster provides a simple shortcode parameter to help you bypass any cache by loading the form via an AJAX request and bypassing the WordPress cache.
Here’s an example of a shortcode with the cache buster parameter:
[gravityforms id pl-c1">123" cachebuster pl-c1">1"]
Gravity Forms offers several user-registration-specific shortcodes. When creating complex forms with user registration fields, these shortcodes can be useful in helping you build registration forms and displaying user registration information on the front end.

There are two shortcode variations that pair well with your user registration flow.
This shortcode displays information about the current user. For example, when viewing a page or post, you can use one or several shortcodes to display information about the user currently logged in.
Here’s an example of a Gravity Forms user shortcode:
[gravityforms action="user" id pl-c1">1" key="nickname" output="list"]
This shortcode displays a login form and pairs well with the Gravity Forms User Information shortcode. This is great for creating custom login pages to keep your user’s experience on brand.
Here’s an example of a Gravity Forms login shortcode:
[gravityform action="login" description pl-c1">false" logged_in_message pl-v">Congratulations! You've successfully logged in!" registration_link_text="Register Now!" forgot_password_text="Sorry, you seem to have forgotten your password" /]
This shortcode variation supports loads more parameters which you can dive into here. If you’re looking to learn more about building robust user management with Gravity Forms, check out our Gravity Forms Login and Auto Login guide.
Gravity Forms conditional shortcodes use conditional logic to allow you to hide or display content based on certain conditions you’ve set.
Conditional logic allows forms to make decisions based on certain set conditions. Here’s an example:
We’ve written a complete guide to Gravity Forms conditional logic if you’re just getting started. It includes advanced conditional logic, pricing, registration, and more!
Gravity Forms conditional shortcodes are used to create custom email notifications and confirmation messages based on a user’s responses.
A quick breakdown:
Gravity Forms conditional shortcodes make it possible to show different form content to different users depending on the data they enter in their submission.
There are two main conditional shortcodes:
Let’s explore both in more detail.
A Basic conditional shortcode is a shortcode that allows the display of different content based on the data a user enters in their submission. It allows the user to create a single condition to be evaluated as either true or false. The content is only displayed if the condition is true.
For example, if you have a list of products from which users can choose and request more information, you could list them using radio buttons in a Gravity Forms form as shown below.

When the user selects one of the options and submits the form, they’ll get a little more information about the selected product. The Basic conditional shortcode would look something like this:
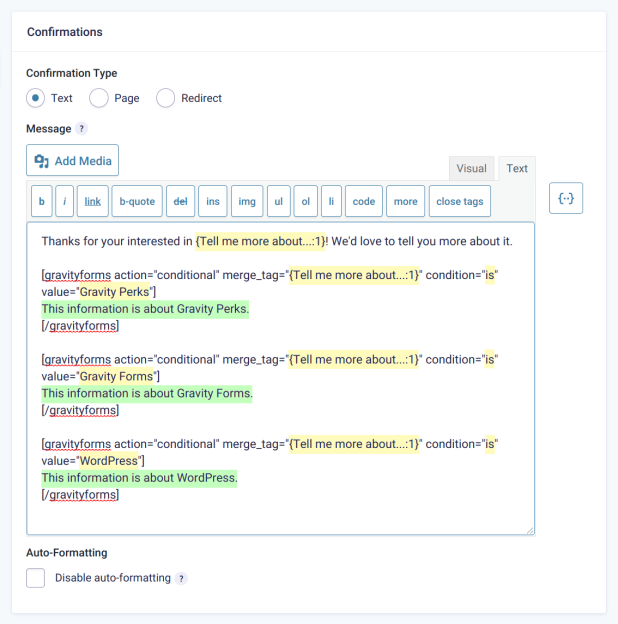
If the user selected the “Gravity Perks” option, the above confirmation code would display the following:

The Advanced conditional shortcode overcomes the limitation of a Basic conditional shortcode of allowing only one condition.
Instead of using multiple basic conditional codes when displaying content from multiple fields, the Gravity Forms advanced conditional shortcode will enable you to use a single code with numerous conditions and parameters.
In addition to saving time, the Advanced conditional shortcode makes it possible to use complex conditional logic in notifications, confirmations, and other features to display content.
Gravity Wiz provides a free plugin for advanced conditional shortcodes that allows you to create multiple conditions with ease.
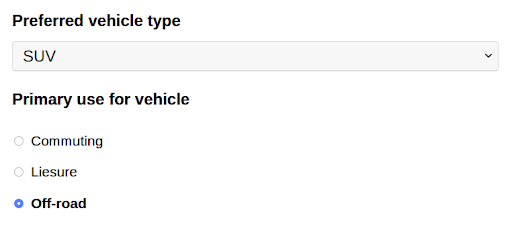
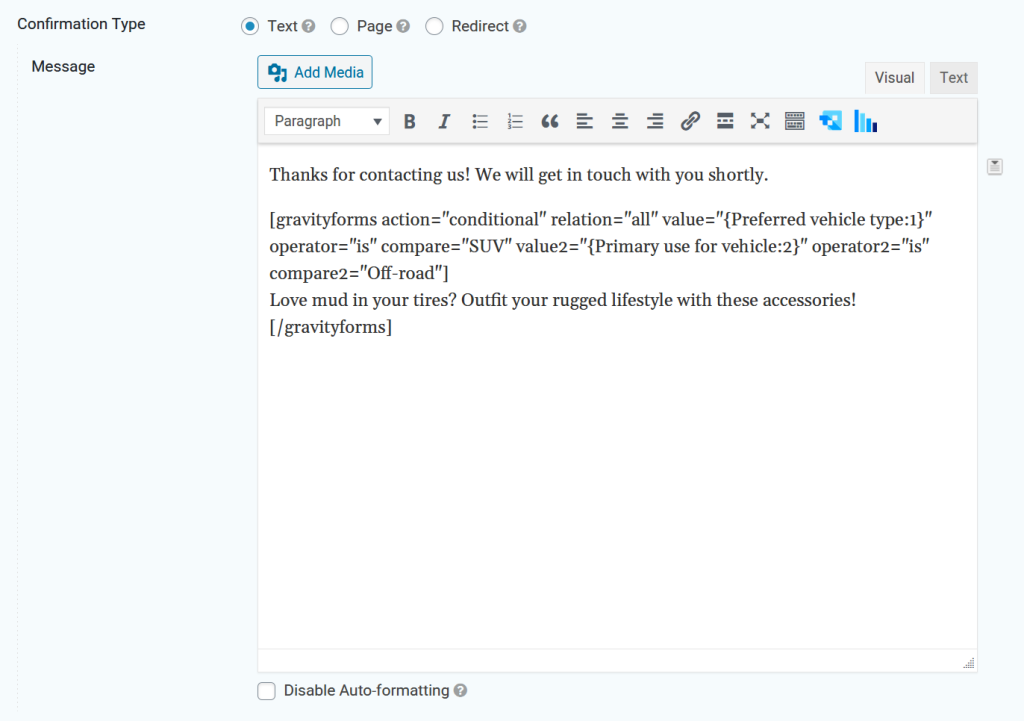
Say you have a store where customers can buy truck and car accessories. You can use an Advanced conditional shortcode to show your customers different products available in your store based on the choices they make when filling out your form. The shortcode would display different outputs based on specific combinations.
In the above scenario where a user chooses “SUV” as the preferred vehicle and “Off-road” as the primary use for the vehicle, you could use an Advanced conditional shortcode to display a unique message for that combined selection as shown below:
This is what the user would see:

In this case, if a user selects any other combination, they’ll get the default message.
You can learn more about the Advanced conditional shortcode, including the parameters you can use here: Gravity Forms Advanced Conditional Shortcode.
The Progress Meter shortcode shows progress towards the completion of a numeric goal, such as the number of submissions, donations made, etc. It can inspire more donations by providing insights into how much money you raise and where your campaign stands. It creates a feedback loop allowing donors to know what milestone or goal has been reached in the fundraising process.
The Gravity Forms Progress Meter shortcode allows you to add a progress meter to your Gravity Forms, set a numeric goal, and automatically track submissions. If you’re collecting payments using the form, the progress meter shortcode will track the amount collected so far. You can also set it to count the number of products sold.
Let’s say you’re trying to collect canned goods for your local food bank. A progress meter is an excellent way of keeping track and encouraging donations – especially since many people want their contributions to count toward something tangible like reaching 10,000 cans!
This is why progress meters are beneficial for things like fundraising. The ability to show other potential contributors the amount you want to raise and how close you are to achieving that goal is a powerful incentive to keep people donating.
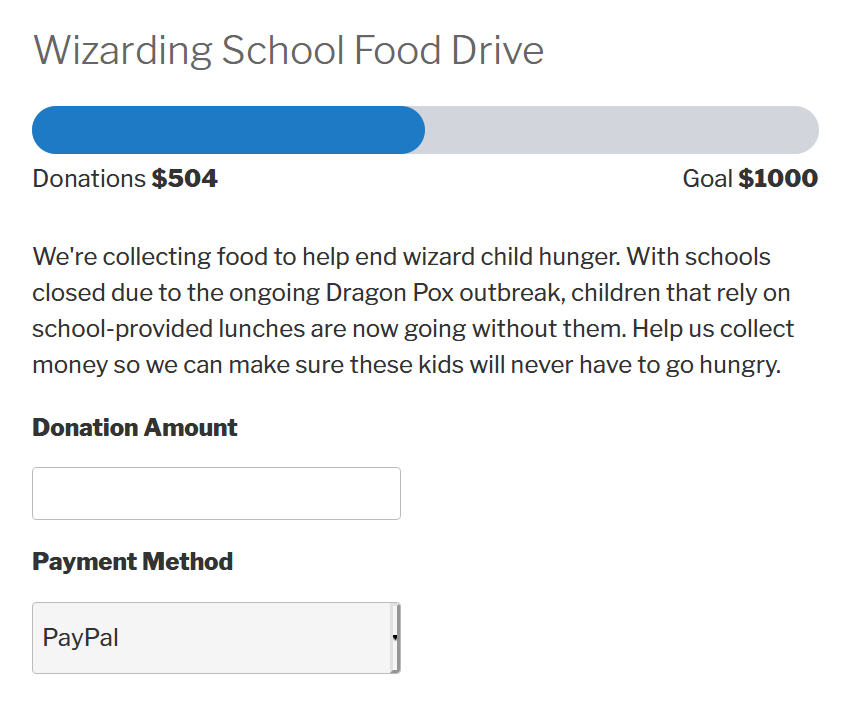
Here’s an example of a Gravity Forms progress meter shortcode:
[gravityforms id pl-c1">211" action="meter" field="payment_amount" count_label pl-v">Donations $%d" goal_label pl-v">Goal $%d" goal pl-c1">1000"]
The progress meter adds several parameters to the Gravity Forms code, including action and goal values. In the example above, the action is set to “meter,” and the goal is set to $1000, meaning the target donation total is $1000. In this case, you would use a Gravity Forms payment add-on like Stripe or PayPal, and donations would be updated once payment has been finalized. This progress meter is similar to what you see on GoFundMe and Kickstarter.
Add a progress meter to your forms and incentivize your audience using our free plugin: Gravity Forms Progress Meter.
Gravity Forms Split Test shortcodes allow you to test different versions of your forms to see which version converts better. This is a great way to increase your form’s conversion rate and get more leads!
To use the Gravity Forms Split Test shortcode, you must create two versions of your form, say, Form 1 and Form 2. The forms will typically have different headlines and calls to action. The difference between the two could be more subtle, including having distinct color buttons, font sizes, etc. You can then use the shortcode to split test them.
The shortcode will randomly display Form 1 or Form 2 to your users.
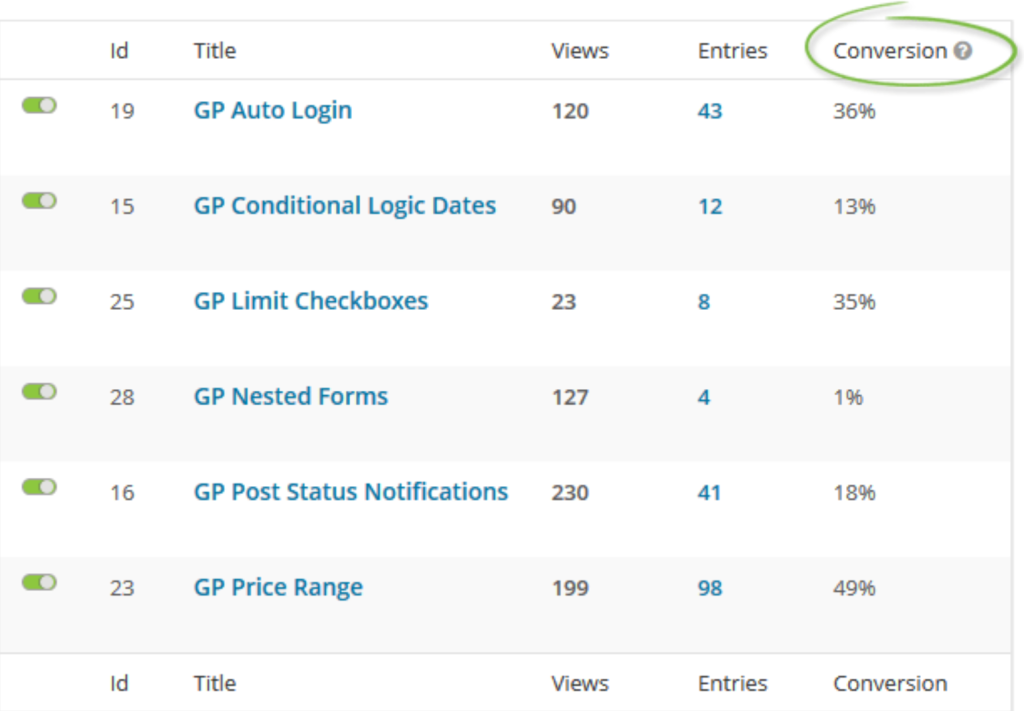
Gravity Forms tracks the conversions for each form. You can see the views each form is getting, the total number of entries, and the conversion percentages. Remember, the more traffic your page receives the more accurate the results of your split test.
Here’s an example of a Gravity Forms Split Test shortcode:
[gravityforms action="split_test" ids pl-c1">1,2"]
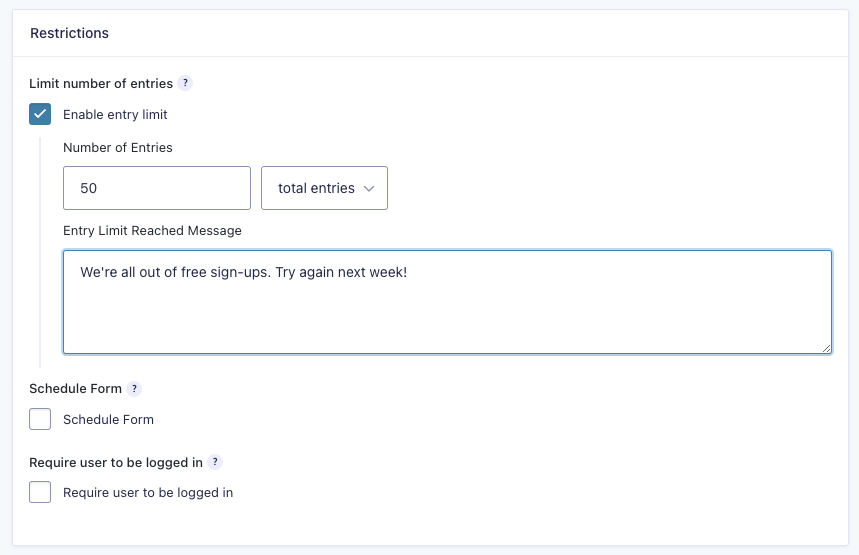
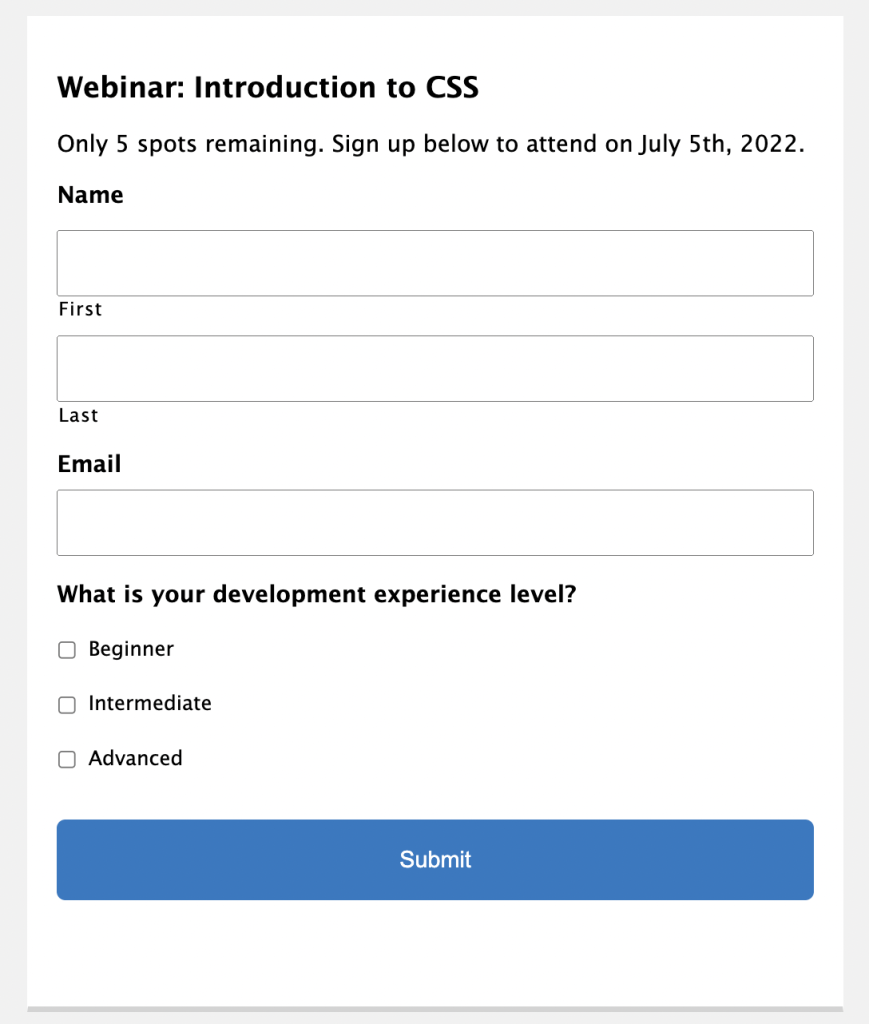
Suppose you want to give users 50 free signups to your service and want each user to see how many free registrations are still up for grabs when they visit your website. You can use the Gravity Forms Entries Left shortcode to show the number of entries left for a given form based on your set limit. It includes the “Limit number of entries” feature, as shown below.
Here’s an example of a Gravity Forms Entries Left shortcode:
[gravityforms action="entries_left" ]
If you want to display the number of entries left for Form 1, you should use the following shortcode:
[gravityforms action="entries_left" id pl-c1">1"]
The code above would display a message: “There are x entries left for this form.”
Here’s an example of this shortcode in action:
Learn how to install and use this shortcode that displays the number of entries left based on the form’s entry limit: Shortcode: Display Number of Entries Left.
If you’re looking for more advanced ways to limit how many times or how often your form can be submitted, check out Gravity Forms Limit Submissions. You can limit the number of entries that can be submitted by user, role, IP, field value, or even the page from which the form was submitted. Additionally, these limits can be restricted to almost any time period.
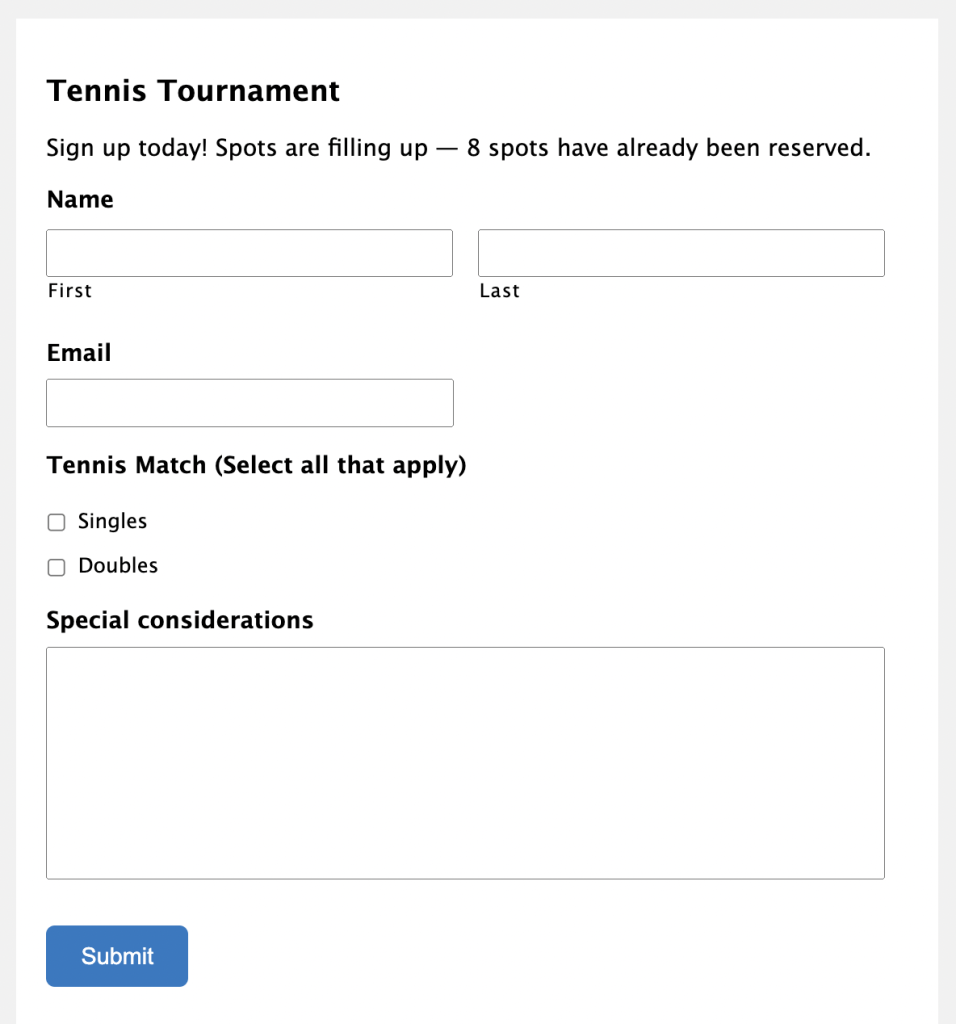
The Gravity Forms Entry Count shortcode allows you to display the number of entries submitted for a given form. This can show potential customers how popular your product or service is by displaying interest via the number of submissions.
For example, this image automatically updates the number of tennis spots left to help encourage users to sign up.
Here’s an example of a Gravity Forms Entry Count shortcode:
[gravityforms action="entry_count" id pl-c1">2" status="unread" format="comma"]
Here you’ll find a compiled list of all the other questions you may have about Gravity Forms shortcodes. If your question is still unanswered after this, comment below, and we’ll be sure to guide you to the best of our ability!
Honestly, not a whole lot.
A shortcode is a small piece of formatted text for WordPress sites that performs a dedicated function with little effort on the user’s part. Shortcodes can create objects or embed files that would otherwise require lots of ugly, complicated code.
For example, the Gravity Forms shortcode lets you embed a form in any post or page on your WordPress site. The form will show up in the post or page where you placed the shortcode, and you won’t need to worry about all the messy markup required to display the form.
An embed code is a chunk of HTML that you can copy and paste into your site to display content from another website. It is typically not meant to be customized, and it can be hard to read if you don’t already know HTML/JS.
No, you don’t need to use a shortcode. You can use the Gravity Forms block if you’re using the Block Editor or the Gravity Forms embed button if you’re using the Classic Editor. However, shortcodes do unlock additional functionality.
Shortcodes! Or, you can use the Gravity Forms block if you’re using the Block Editor or the Gravity Forms embed button if you’re using the Classic Editor.
A WordPress shortcode is a code that allows you to do things like embed videos or create columns in your posts and pages. A Gravity Form shortcode is a WordPress shortcode specific to Gravity Forms. This shortcode will enable you to display Gravity Forms on your WordPress site and take advantage of other Gravity Forms features.
Yes, if the widget supports shortcodes. Not sure? Let us know which widget you’re using and we’ll do our best to confirm.
Yes, you can. WordPress supports shortcodes in all post and page content by default.
You can use an array of Gravity Forms codes based on the functionality you hope to add to your forms. They include :
We discuss these parameters in detail in the Gravity Forms Shortcode Parameters above.
WordPress 3.5 or higher and PHP 5.3+.
Nope! One of the great things about Gravity Forms is that it doesn’t require any coding knowledge.
If you want to display your form as quickly as possible and you’re using the Block Editor, we recommend the Gravity Forms block. It’s the easiest solution!
If you’re using the Classic Editor, use the Embed Form button. It will generate the shortcode for you with just a few clicks.
If you have additional requirements or want to tap into the extended functionality offered by the [gravityforms] shortcode, then working with the shortcode directly is the way to go.
You can use the field_values parameter to dynamically populate form fields. This can be useful when you want to pre-fill fields with information already entered on your site or pull data from other sources.
The dynamically populated field can be a visible field that the user can make changes to, or you can set it as a hidden field so that the form user only sees vital information. You can learn more about how to dynamically populate Gravity Forms using shortcodes here, including setting up Gravity forms shortcode field values.
If you want to take this a step further, check out Populate Anything, which allows you to dynamically populate form fields and values from any source. You can also use Read Only to set fields to a read-only state, where they cannot be changed.
If your Gravity Forms shortcode isn’t working, we recommend starting with these steps.
The do_shortcode() is a WordPress function that parses the passed content for shortcodes. For example, the WordPress content editor is a location where shortcodes are parsed and executed. Many themes and plugins leverage this function to parse shortcodes in their own theme or plugin-specific locations.
It is typically recommended to use the gravity_form() function rather than using something like do_shortcode( ‘[gravityforms ) to output a form.
Gravity Forms are often styled using custom CSS or by using one of the many available plugins that add custom styling to Gravity Forms.
Here are a few places to start:
Don't miss a thing. Get our weekly updates by owl or email. Ok, we're still working on the owl service, so just email for now.
Did this resource help you do something awesome with Gravity Forms?
Then you'll absolutely love Gravity Perks; a suite of 47+ essential add-ons for Gravity Forms with support you can count on.
Hello Wizards: I am making heavy use of the field_values parameter in my shortcode to enable me to use a single form and dynamically make wizardry of all kinds happen. However, I am not the one who needs to populate the shortcode, the owner/editor of the website is, and they’re not very technically comfortable. So, asking them to type field_values=”event_name=Awesome event&event_type=multiday&onsite=true” is a recipe for heartache. Do you know of anyone who’s made a plugin that essentially creates a UI for entering a fixed set of parameters, similar to the way custom fields work, that can be concatenated into the field values attribute when the page is loaded? My current workaround is not pretty.
Dario August 2, 2023 at 2:43 pm We’ve followed up via email Iain. Best, Chris Hajer September 5, 2022 at 9:59 pmI notice [gravityform] as the shortcode a few times and [gravityforms] more often. Are they interchangeable, and are there any differences between the two? What’s the history here?
David Smith Staff September 7, 2022 at 3:32 pmGreat question, old friend. The singular version, [gravityform], is the recommended solution from the Gravity Forms team but they are interchangeable. The shortcode was originally plural, [gravityforms], but at some point it seemed to make sense to make it singular since it only displays a single form. We have the same tough decision to make when referring to a Gravity Forms form – or is it just a Gravity Form? or maybe a Gravity form? 😅